|
Lightning Applet Instructions
This applet is a partial implementation of the algorithm described in the Pacific Graphics 2004 paper Physically Based Animation and Rendering of Lightning by Theodore Kim and Professor Ming C. Lin. All the graphical elements are done with Java AWT, so the applet should run fine even if your Java version is really old.
Step 1: Simulation
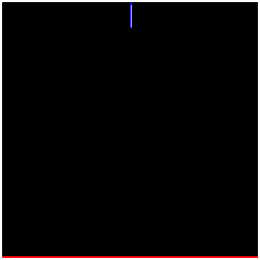
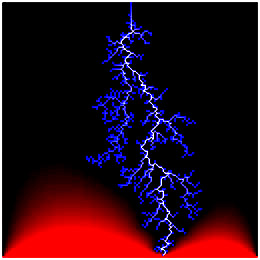
The small blue line at the top of Figure 1 is the very first step in lightning formation, known as a initial breakdown. When the 'Grow' button is pressed, subsequent breakdowns are simulated, building a lightning path that winds down towards the ground. Once the lightning hits the ground, it stops growing, because the negative charge in the sky now has a direct conduit to the ground.
The red halo is the electric potential surrounding the forming lightning, and the blue blocks show where the lightning has already formed.
Figure 1: Left - Initial startup screen. Right - Completed simulation. The applet allows you to simulate the lightning bolt at various resolutions. However, each higher resolution requires at least 16 times the computation time of the previous resolution. However, the visual quality of the lightning improves significantly at higher resolutions, so the extra time spent can be worthwhile. Comparison of results at different resolutions. Step 2: Rendering Once the lightning hits the ground, electrons flow from the sky to the ground, causing the lightning to glow. We produce this glow using an atmospheric point spread function (APSF). The APSF is applied by pressing the 'Render' button. The rendering stage involves taking the Fast Fourier Transform (FFT) of a precomputed APSF filter, as well as the FFT of the line segments in the lightning. It takes several seconds to compute, so please be patient.
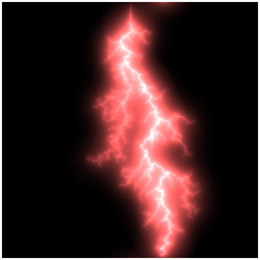 Figure 2: Final rendered lightning Once the rendering is complete, the color of the lightning can be tweaked using the RGB sliders located above the 'Render' button. Other Controls The simulation can be reset using the 'Reset' button. All simulation and rendering results will be lost. The simulation can also be paused by pressing the 'Pause' button. The 'Pause' button will not pause the rendering stage. The rendering stage should not take more than a few seconds unless your computer is extremely slow. The 'Advanced' panel allows you to add 'attractors' to the simulation. Attractors are negatively charged point sources that will attract the lightning path. They can be added by first selecting 'Attractors' from the 'Add charge' dropdown, and then clicking the location of the desired point charges within the simulation window. The added charge will appear as green dots in the simulation. You will notice that around the green dots, red halos will form. This is because the electric potential in the neighborhood of the charge has been increased, which will attract the lightning bolt. Details This applet is an implementation of the dielectric breakdown model (DBM) described in our paper. The APSF is not computed by the applet, and is instead loaded at runtime from a file. You may notice that some of the glow from the bottom of the lightning bolt wraps around back to the top of the image. This is due to the toroidal geometry assumption of the FFT. If anybody has a nice non-power-of-2 Java FFT implementation that I can use to get rid of this artifact, please let me know. To Do
UNC GAMMA Research Group Questions? Bugs? Email: kim att cs dott unc dott edu |